> For the complete documentation index, see [llms.txt](https://academy.looply.ai/llms.txt). Markdown versions of documentation pages are available by appending `.md` to page URLs; this page is available as [Markdown](https://academy.looply.ai/integrations/sap-integration/triggering-sap-code-from-looply.md).

# Triggering SAP code from Looply

You can instruct your Looply workflow to make an HTTP request to SAP by using the *HTTP Request (SAP)* step. While you can make a request to any SAP endpoint, the ABAP Looply Add-On provides two endpoints with hook points to call your own custom code and these will be discussed here.

## POST Data to SAP

### Set-up on Looply

Configure your step as follows:

#### SAP Profile

Here you may Use the dropdown to select any of your pre-configured SAP Profiles that you have created and integrated with Looply.&#x20;

Often however you may want the workflow to send the request to the system in your landscape that it was triggered from, instead of maintaining a different workflow for your development, quality and production systems. You can do this by toggling the *Bind profile dynamically* switch and binding the *System ID* and *Client ID* fields with the respective fields in your payload. When Looply workflows are triggered by the /LOOPLY/CORE=>TRIGGER\_WF method, these fields are added to the payload automatically.

#### Service Path

Enter the following path: **/sap/opu/odata/looply/service\_srv/**

Note: If you have included a / at the end of the *Host URL* field in your SAP integration do not include it at the start of the service path as the values of the two fields are concatenated when the request is made.

#### Entity Name

Enter the following value: **DataInSe**t

#### Request Method

Select **POST**

#### Body

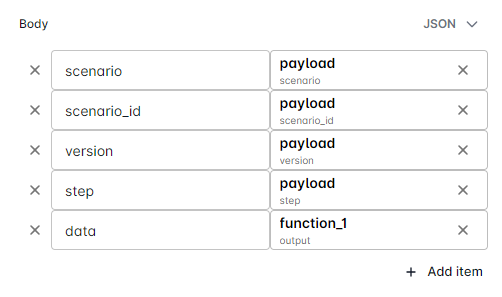
You may add the following fields to the request body:

<figure><img src="/files/Br2V5Lt2UCYHu7X2RSdR" alt=""><figcaption></figcaption></figure>

With the exception of field scenario\_id, the rest of the fields are optional and can be omitted. In the above screenshot, the first four fields are bound to fields in the payload (see section [Triggering a Looply Workflow](/integrations/sap-integration/triggering-or-resuming-a-looply-workflow-from-sap.md#triggering-a-looply-workflow) for more details) and will be used to determine the Z-function to be called once the request reaches the back-end. *data* contains additional data we want to send to the back-end and may include fields from the payload, information about a button the end-user clicked on, data entered into fields on the card (you can find more information on how to pass data from the card to the workflow [here](https://academy.looply.ai/integrations/sap-integration/pages/wgJsiyF3JzmHtJC4ZSj8#action.submit) ) etc. In this example we have used a function step which outputs a json string containing all these fields.

### Configuration in your SAP system

In your SAP system, create a new function module by copying sample function */LOOPLY/SAMPLE\_POST.* The function has the following signature:

<table><thead><tr><th width="175">Parameter Name</th><th width="78">Type<select><option value="7PeeNLqDkkwr" label="Import" color="blue"></option><option value="pPvjjLIx59Z2" label="Export" color="blue"></option></select></th><th width="116">ABAP Type</th><th>Description</th></tr></thead><tbody><tr><td>IM_DATA</td><td><span data-option="7PeeNLqDkkwr">Import</span></td><td>STRING</td><td>Data passed in from Looply workflow. (corresponds to request body field <em>data</em> above)</td></tr><tr><td>EX_SUBRC</td><td><span data-option="pPvjjLIx59Z2">Export</span></td><td>SYSUBRC</td><td>Subrc code passed back to the workflow</td></tr><tr><td>EX_MESS</td><td><span data-option="pPvjjLIx59Z2">Export</span></td><td>BAPIRET2</td><td>Message to be logged in the SAP log and passed back to the workflow</td></tr><tr><td>EX_DATA</td><td><span data-option="pPvjjLIx59Z2">Export</span></td><td>STRING</td><td>Data passed back to Looply</td></tr></tbody></table>

TIP:  To convert an incoming json string to an internal table or structure you can use method /ui2/cl\_json=>serialize. To convert an internal table or structure to a json string to be passed back to Looply you can use method /ui2/cl\_json=>deserialize.

Next, make a configuration entry via the following IMG transaction: \
SPRO->General Application Functions->Looply->Process Determination\
Insert the values passed into the request body for fields *Scenario, Scenario ID, Version, Step* and the name of your newly created function module in field *Function.* You may leave fields *Workflow ID* and the non-key *Version* field blan&#x6B;*.* When the request reaches the back-end, the configuration table will be read based on the *Scenario, Scenario ID, Version and Step fields* and your function module will be called dynamically.&#x20;

## Download file from SAP

In certain scenarios, you may wish to include a button or a link to download a file/attachment from your sap system in a Microsoft Teams card. You can achieve this in the following way:

### Example - Adaptive Card

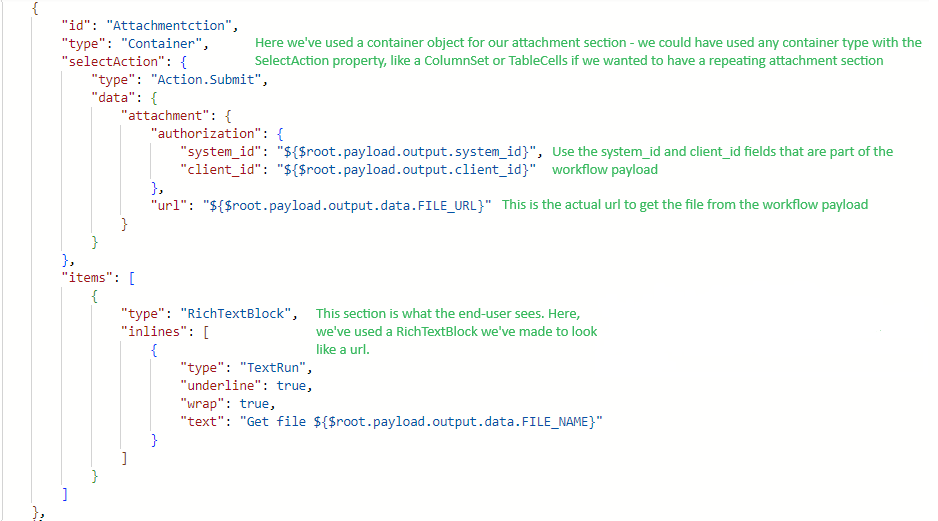
Insert a Container to your card. (You can use any container type that that has a "*Selection action*" property like a *ColumnSet* or *TableCells* if you have multiple attachments)

<figure><img src="/files/vFnPfrtDrtcce9M011WW" alt=""><figcaption></figcaption></figure>

If a gateway service endpoint which fetches the file already exists on your sap system you may use a url to that service. (Stelo users for example can include a url to Stelo service /STELO/APP\_SERVER\_SRV/AttContentSet to retrieve attachments in their payload. For example:\
[https://\<host>/sap/opu/odata/stelo/app\_server\_srv/AttContentSet('\<attachment cms document>')/$value](https://demo05.arch.co.uk:44300/sap/opu/odata/STELO/APP_SERVER_SRV/AttContentSet\('ACL-TID2-E-00-1000004307-0002-01'\)/$value) ) &#x20;

In other scenarios, an endpoint that fetches the file you want to download might not exist. In such cases you can use a url to the endpoint provided by the Looply ABAP add-on: [https://\<host>/sap/opu/odata/looply/service\_srv/AttSet(scenario='\<scenario>',scenario\_id='\<scenario\_id>',version='\<version>',step='\<step>',data='\<data used to get file>')/$value](https://fiori-dev.sunderland.gov.uk/sap/opu/odata/LOOPLY/SERVICE_SRV/AttSet\(scenario='WI',scenario_id='WS93000012',version='2',step='002',data='10400921__0045000241'\)/$value)

Using a url with the above format will allow you to call your own Z-function to return a file.  You can create such a Z-function by copying  sample function */LOOPLY/SAMPLE\_GET\_FILE.* The function has the following signature:

<table><thead><tr><th width="175">Parameter Name</th><th width="78">Type<select><option value="7PeeNLqDkkwr" label="Import" color="blue"></option><option value="pPvjjLIx59Z2" label="Export" color="blue"></option></select></th><th width="116">ABAP Type</th><th>Description</th></tr></thead><tbody><tr><td>IM_DATA</td><td><span data-option="7PeeNLqDkkwr">Import</span></td><td>STRING</td><td>String from 'data' url parameter</td></tr><tr><td>EX_SUBRC</td><td><span data-option="pPvjjLIx59Z2">Export</span></td><td>SYSUBRC</td><td>Subrc code passed back to the workflow</td></tr><tr><td>EX_MESS</td><td><span data-option="pPvjjLIx59Z2">Export</span></td><td>BAPIRET2</td><td>Message to be logged in the SAP log and passed back to the workflow</td></tr><tr><td>EX_XDATA</td><td><span data-option="pPvjjLIx59Z2">Export</span></td><td>XSTRING</td><td>File data in XSTRING format</td></tr><tr><td>EX_MIME_TYPE</td><td><span data-option="pPvjjLIx59Z2">Export</span></td><td>STRING</td><td>File Mimetype</td></tr><tr><td>EX_FILENAME</td><td><span data-option="pPvjjLIx59Z2">Export</span></td><td>STRING</td><td>Filename</td></tr></tbody></table>

Next, make a configuration entry via the following IMG transaction: \
SPRO->General Application Functions->Looply->Process Determination\
Insert the values that match the url parameters for fields *Scenario, Scenario ID, Version, Step* and the name of your newly created function module in field *Function.* You may leave fields *Workflow ID* and the non-key *Version* field blan&#x6B;*.* When the request reaches the back-end, the configuration table will be read based on the *Scenario, Scenario ID, Version and Step fields* and your function module will be called dynamically.&#x20;